Before you can enter purchase invoices or details of payments to Suppliers, it is necessary to enter basic Supplier information into your Purchase Ledger in the accounting software.
By setting up a Supplier (or Creditor) you are creating a Purchase Ledger Account which is used to keep track of amounts owed and payments made to Suppliers.
To setup Suppliers you will need their business Names and Addresses (and the Contact Names, Telephone and Fax numbers etc. if you wish to use them).
You will also need a list of the opening balances on your Supplier accounts in the accounting software.
Add a New Supplier.
- Select Suppliers from the Setup menu or the Lookup Screen.
- At the Supplier browse screen click on ‘Add’.
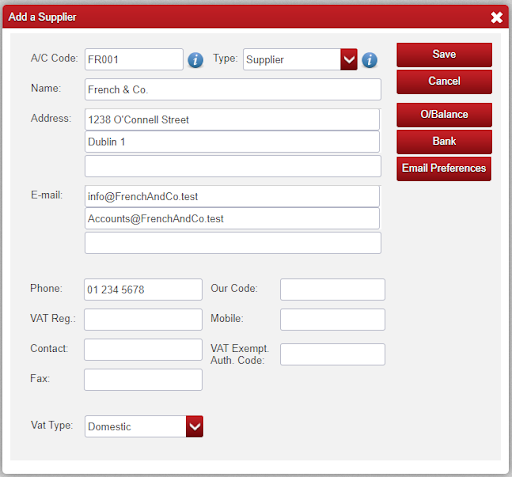
A screen similar to the one below will be displayed:
A/C Code.
You will be asked to specify a unique code for each Supplier.
Each code can be up to 8 characters long and can consist of all numbers, all letters, or a combination of both.
If you are already using a coding system you may wish to retain it.
If you wish to set up new codes we recommend that you consider the following:
- If using purely numeric codes pad out with zeroes
- i.e. 001, 002 etc. rather than simply 1, 2 so that sorting will be consistent in reports and lookups.
- If you have a small number of Suppliers then consider using the first three or four letters of the Supplier name as a code
- e.g. GUI or GUIN for Guinness.
- With a larger number of accounts a combination of letters and numbers works well,
- e.g. G0000001 or GA000001 for Gainers, G0000002 or GR000001 for Groves & Co. etc.
Type.
For a new Supplier this should always be left as ‘Supplier’.
The ‘Dormant Supplier’ option can be applied to old Supplier accounts if you now longer Purchase from them to remove them from Reports where they will no longer apply.
To do this they must have a 0 balance and no transactions within the financial year that you are marking them as Dormant.
Name.
The name of the account that you are purchasing from. IE. ‘Big Red Cloud’ or ‘Eir’
Address
The Address of the Supplier. It is for memorandum purposes only.
You can enter up to 5 contact email addresses here for this supplier.
If you are using the Allocations option remittances may be sent to any or all of these.
Phone
A contact phone number. It is for memorandum purposes only.
VAT Reg
The VAT Registration number for your supplier. It is for memorandum purposes only.
Contact
The name of a Contact in the Suppliers company such as a Salesperson or account manager. Normally the person whose Phone Number is above.
Fax
A fax number for the Supplier. It is for memorandum purposes only.
Our Code.
This is the code by which your Supplier identifies you. It is for memorandum purposes only.
Mobile
A contact phone number. It is for memorandum purposes only.
VAT Exempt Auth. Code
A field to store the identifier required when a Supplier has a VAT Exemption.
Vat Type
The VAT Type that should be applied on this Suppliers Invoices.
Opening Balance.
The Opening Balance is the balance due when starting to use Big Red Cloud, i.e. the First Month of Transaction Entry.
For example, your Financial Year may start in January but you may be starting to use Big Red Cloud accounting software in August and have set the First Month for Transaction Entry to August.
To enter the Supplier’s Opening Balance click on the button marked O/Balance.
Fill the Aged breakdown of the Opening Balance into the ‘Current’, ‘1 Month’, ‘2 Months’ and ‘3 Months Plus’ fields as appropriate. This will update the ‘Balance Starting’ field at the top for you.
When finished click on OK to save and close.
When Manual Allocations is not enabled the screen below is displayed.
The Opening Balance screen for a Supplier (showing the Age Analysis method in use).
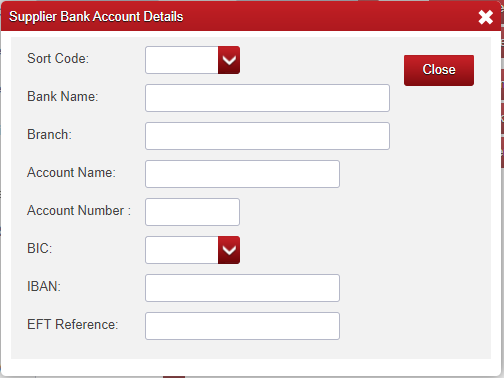
Bank Account
By clicking on the ‘Bank’ button you can enter bank account details for your supplier.
These are currently for memorandum purposes only.
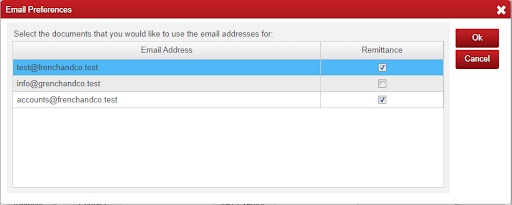
Email Preferences
By clicking ‘Email Preferences’ you can choose which of the email addresses you have added to the account will receive Remittances when they are sent.
And address that you untick will not receive a remittance when they are sent.
Remittances are only available in accounts which are using Allocations.


