Sales Invoices have a detail line for each item sold. This is required to produce a Sales Invoice for the customer in the accounting software.
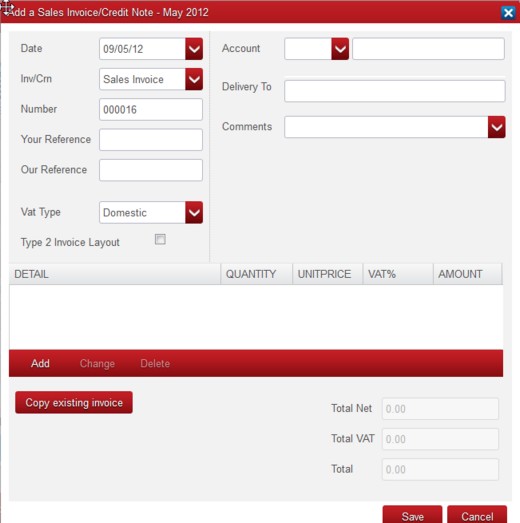
At the Sales Book browse screen click on the Add button. You will then be asked to Select Entry Type, select Sales Invoices and click OK. A screen similar to the one below is displayed.
Notes On Producing A Sales Invoice/Credit Note.
Header Information.
Copy Existing Entry.
This button allows the information from a different Sales Book entry to be taken and used in a new entry. When the button is pressed you are asked for both the Reference Number and the Account Code of the invoice to be copied. With this information the Big Red Cloud® fills in the details of the new invoice which can then be edited if necessary and saved.
Date.
Enter the Invoice/Credit Note date. As described earlier, the program attaches more importance to the month of entry than it does to the date of the transaction. However, the date you enter here can be important because in the Sales Ledger (unlike in the Sales Book) Invoices are listed in transaction date sequence.
Invoice/Credit Note.
This box defaults to Sales Invoice. When entering a Credit Note change to ‘Sales Credit Note’ by clicking on the arrow to the right and selecting Sales Credit Note.
Number.
The next sequential Invoice Number is displayed and can be overwritten.
If you have chosen to have the Invoice Number assigned as the transaction is saved then ‘AUTO’ is displayed instead and cannot be changed. To change this option see Setup / Reference Settings.
Note: When the Invoice Number is changed manually, the system will treat the ‘new’ invoice number as the new start point. To return to the original ‘next number’ you should overwrite it and thereby ‘reset’ the sequence.
Your Reference.
This box may be used to record any Customer Reference Number or Name such as their Purchase Order Number, the Name of the person who ordered the goods etc. Depending on which Invoice Layout you select this may print out with the description “P.O. Number” or “Your Ref.”
Our Reference.
This box may be used for any additional reference you may wish to enter, e.g. your Delivery Docket Number or the Sales Representative who took the order etc., details such as their Purchase Order Number, the Name of the person who ordered the goods etc. Depending on which Invoice Layout you select this may print out with the description “Delivery Docket No.” or “Our Ref.”
VAT Type.
If the Invoice you are creating is in respect of goods/services supplied within the same state and is subject to VAT in the normal way, i.e. it is a Domestic transaction, then you need take no action, simply move on.
If the Invoice is for goods/services delivered outside the state then you will need to change it. From the drop-down list point-and-click at whichever of the two alternatives is appropriate:
| Other EU. | Sale is to another EU state. |
| Foreign – Non EU. | Sale for export to anywhere other than the EU. |
| VAT Exempt. | Customer is VAT Exempt. |
It is important that all Non-Domestic transactions are correctly coded so as that the VAT Return figures for Other EU and Foreign Sales are correct.
Account.
You must enter a Customer’s A/C Code. Press F7 or click on the arrow on the right to see a list of Customers or add a new one.
Once you enter a Sales Ledger A/C Code the relevant Customer’s name will automatically display on the line adjacent to this box. The remainder of the Address (or Delivery Address, where relevant) will display on the other lines.
Comments.
If required, type in whatever words or phrases you wish into this one line box. Depending on which Invoice Layout you select, these Comments are printed in different places on the Invoice. “Terms: Net 30 Days” is a typical example.
User Defined Fields.
If relevant, complete either or both of these boxes.
Line Items.
To add a Line Item click on the Add button.
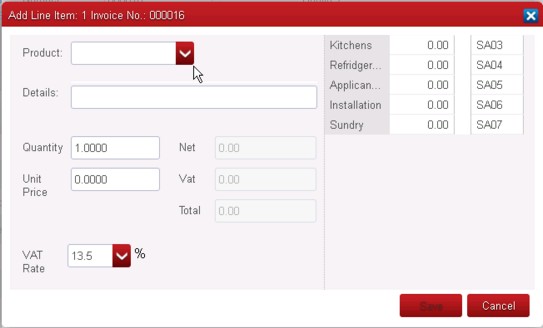
The screen to Add a New Line Item to an Invoice.
Product.
Product code is not mandatory. Details of a line item can be entered without a Product Code.
Enter the Product Code directly or look up Products by clicking on the down-arrow to the right of the field. All the details entered when the product was set up will appear, and can be adjusted for this invoice, if necessary.
Details.
Enter up to eight lines of Detail to describe the Product or Service sold to the Customer. If you entered a Product Code above, the stored description will be entered for you. You can amend the displayed description if you wish.
Tip: You cannot leave blank lines in the middle of the description. If you wish to leave a gap it is recommended you enter an asterisk * or a full stop at the beginning of an otherwise blank line.
Quantity.
The program defaults to showing a Quantity of one. In all circumstances a Quantity must be entered.
For Credit Notes the default Quantity must be a minus quantity.
Unit Price.
Enter the Unit Selling Price, excluding VAT, of the Product or Service sold. If you entered a Product Code above the stored Unit Selling Price will be entered for you, though you can amend it if you wish. If you have opted to allow a previously setup product to allow gross pricing, you will find that the net amount has been calculated into this box from the gross amount set for that product.
VAT Rate.
Accept the displayed VAT Rate for this Product Code or select the appropriate rate from the drop-down list.
The Net Amount, VAT Amount and Gross Total boxes are automatically updated.
Analysis Categories.
Analyse the Net Amount of this Product/Detail line into one (or more) of the various analysis headings. The program will not allow you to proceed until the total of the Analysis Category amounts equals the Net Amount.
Tip: When entering amounts in the Analysis Categories, the full or remaining unallocated amount can be entered into the box you are currently at by pressing the Page Down (PgDn) key.
If you have to add additional Line Items to the Invoice, repeat the procedure described above.
The original Add a Sales Invoice/Credit Note screen with the Header information will then display a line-by-line summary of the Details you have just entered. Towards the bottom right-hand-side you will see the Invoice’s Total Net, Total VAT and (Gross) Total. If you require to Add further items you may do so. To Change or Delete any of the items, highlight whichever line/item is appropriate and proceed.
You can now either Save, Print or Cancel the Invoice:
- Save has the effect of immediately entering the Invoice details into the Sales Book and the Sales Ledger.
- Print saves the Invoice and then Prints the invoice directly to the default printer.
- Cancel cancels this Invoice and makes no entries in the system.


